# LTF Structure

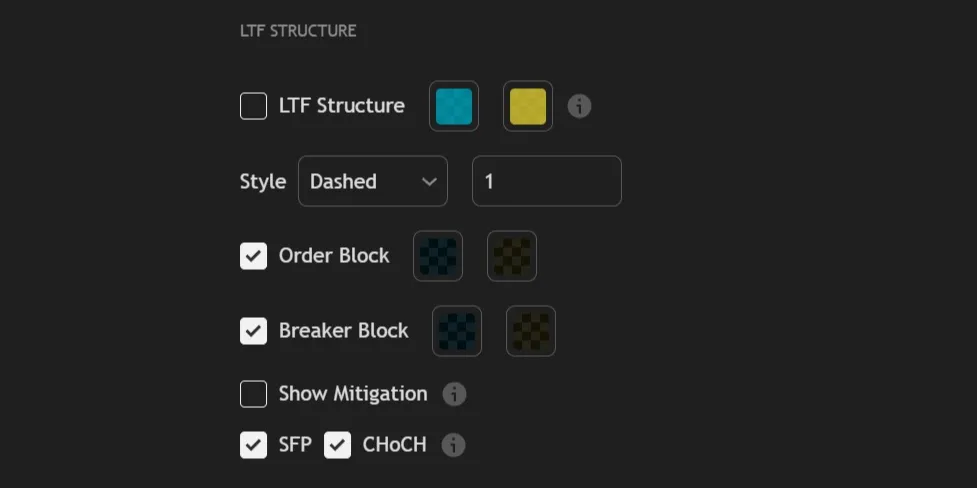
LTF Structure runs directly on your chart timeframe bars — independent of the HTF engine. It provides the real-time CHoCH confirmation leg used in all four Wolf Setups, and gives you a granular view of momentum at the entry level.

***

<figure><img src="https://2404540482-files.gitbook.io/~/files/v0/b/gitbook-x-prod.appspot.com/o/spaces%2FuK39Nj2efLknCBW9clay%2Fuploads%2Fgit-blob-c1e29b7798665e88dbe810c6a09d2fcc5c5d8851%2FLTF.png?alt=media" alt=""><figcaption></figcaption></figure>

***

## Structure

<table data-header-hidden><thead><tr><th width="40"></th><th></th></tr></thead><tbody><tr><td><mark style="color:green;"><strong>1.</strong></mark></td><td><kbd><mark style="color:purple;"><strong>LTF Structure</strong></mark></kbd> enables LTF structure — breaks and ranges running directly on your chart timeframe bars, independent of the HTF engine. This is the fastest-moving layer — it reflects real-time momentum and is the source of the CHoCH confirmation used in all four Wolf Setups. Allows you to customize the colors for bullish and bearish LTF breaks.</td></tr></tbody></table>

<table data-header-hidden><thead><tr><th width="40"></th><th></th></tr></thead><tbody><tr><td><mark style="color:green;"><strong>2.</strong></mark></td><td><kbd><mark style="color:purple;"><strong>Style</strong></mark></kbd> controls the line style and thickness used to draw LTF structure breaks and ranges.</td></tr></tbody></table>

***

## Zones

<table data-header-hidden><thead><tr><th width="40"></th><th></th></tr></thead><tbody><tr><td><mark style="color:green;"><strong>3.</strong></mark></td><td><kbd><mark style="color:purple;"><strong>Order Block</strong></mark></kbd> enables the display of LTF Order Block zones and allows you to customize their colors. LTF OBs are the tightest zones in REx — formed on your chart timeframe, they mark precise entry-level supply and demand.</td></tr></tbody></table>

<table data-header-hidden><thead><tr><th width="40"></th><th></th></tr></thead><tbody><tr><td><mark style="color:green;"><strong>4.</strong></mark></td><td><kbd><mark style="color:purple;"><strong>Breaker Block</strong></mark></kbd> enables the display of LTF Breaker Block zones and allows you to customize their colors.</td></tr></tbody></table>

<table data-header-hidden><thead><tr><th width="40"></th><th></th></tr></thead><tbody><tr><td><mark style="color:green;"><strong>5.</strong></mark></td><td><kbd><mark style="color:purple;"><strong>Show Mitigation</strong></mark></kbd> displays the mitigation state and penetration percentage on LTF OB and BB zones in real time.</td></tr></tbody></table>

***

## Events

<table data-header-hidden><thead><tr><th width="40"></th><th></th></tr></thead><tbody><tr><td><mark style="color:green;"><strong>6.</strong></mark></td><td><kbd><mark style="color:purple;"><strong>SFP</strong></mark></kbd> enables the display of Swing Failure Patterns at LTF range boundaries. These are referred to as <strong>L-SFPs</strong> in the context of Setup #2 — the wick that enters an HTF zone to trigger the AOI LTF entry.</td></tr></tbody></table>

<table data-header-hidden><thead><tr><th width="40"></th><th></th></tr></thead><tbody><tr><td><mark style="color:green;"><strong>7.</strong></mark></td><td><kbd><mark style="color:purple;"><strong>CHoCH</strong></mark></kbd> enables the display of Change of Character lines at LTF boundaries. LTF CHoCH is the confirmation leg used in all four Wolf Setups.</td></tr></tbody></table>

***
